Unlocking Product Reviews

Unlocking Product Reviews in Doofinder Layer: A Step‐by‐Step Guide

Did you know that you can seamlessly integrate product reviews directly into your Doofinder layer, providing your customers with valuable insights before making a purchase decision? While this modification requires some coding expertise, it can significantly enhance your user experience.
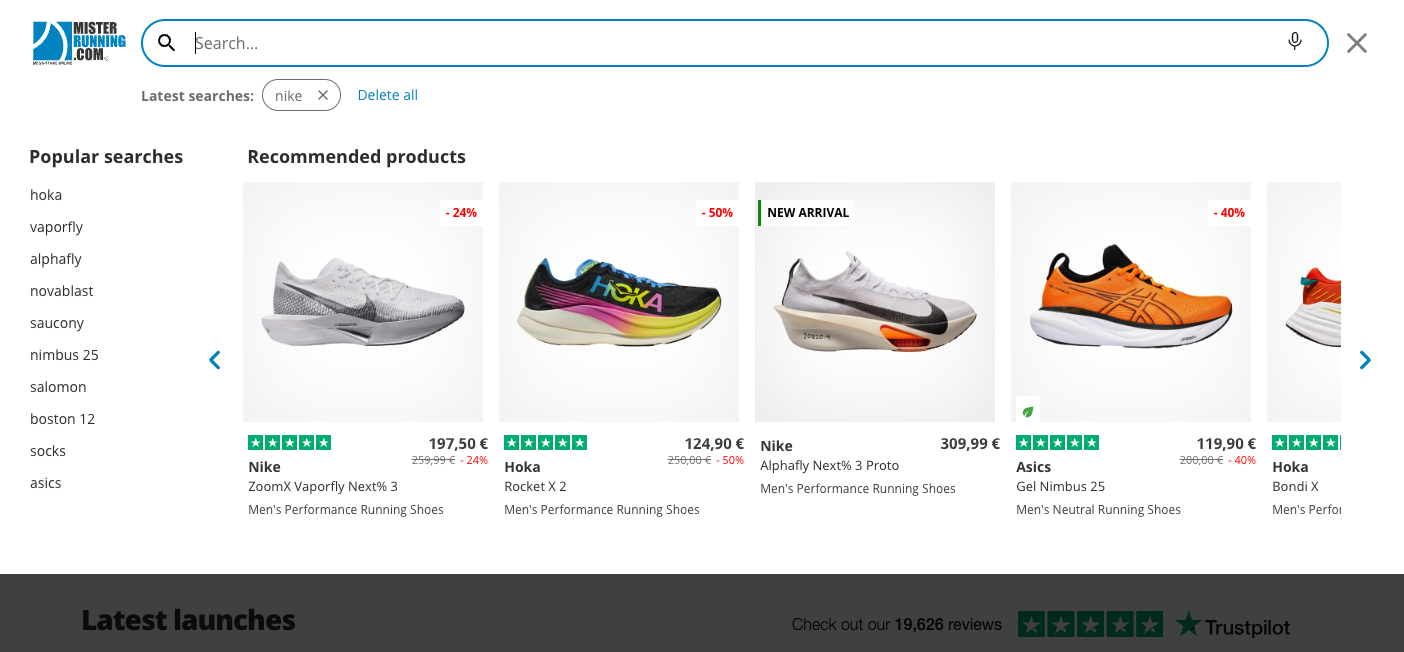
Product Reviews Ejemplo

Follow these steps to make your product reviews shine:

1. Get the Index Ready:

Before diving in, ensure the following information is indexed in Doofinder: - An attribute indexing reviews (e.g., df_rating). - Optionally, another attribute for the number of reviews (e.g., 'df_count').

Example:

df_rating: 5 (for a 5-star rating)
df_count: 10 (indicating 10 reviews)

Note: If you use our plugin, consider using a custom data feed or API to export these attributes.

With this information in hand, we can now move forward with configuring the Doofinder layer and script.

2. Modify the Card Template:

Access the product card template in your Doofinder admin and insert the following block where you want to display the reviews:

<div class="dfd-review">     
    <div class="dfd-card-rating" title={@item["df_rating"]}>
        <!-- Stars representation -->
        <div class="dfd-rating__value">
            <span></span><span></span><span></span><span></span><span></span>
        </div>    
        <!-- Placeholder for empty stars -->
        <div class="df-rating__placeholder">                          
            <span></span><span></span><span></span><span></span><span></span>
        </div>
    </div>
    <!-- Display count if available -->
    <%= if @item["df_count"] do %> 
        <div class="dfd-rating__count" title={@item["df_count"]}>
            (<%= @item["df_count"] %>)
        </div>          
    <% end %>    
</div>

Employ the following block if you choose not to display the number of reviews.

<div class="dfd-review">     
            <div class="dfd-card-rating" title={@item["df_rating"]}>
              <div class="dfd-rating__value">
                <span></span><span></span><span></span><span></span><span></span>
              </div>    
              <div class="df-rating__placeholder">                          
                <span></span><span></span><span></span><span></span><span></span>
              </div>                 
            </div> 
</div>    

3. Modify the CSS:

Enter the CSS configuration in your Doofinder admin and add the following rules:

.dfd-card-rating {
    position: relative;
    display: inline-flex;
}

.dfd-review {
    display: flex;
    align-self: center;
    margin-top: 8px;
}

.dfd-rating__count {
    margin-left: 5px;
}

.dfd-rating__value {
    position: absolute;
    overflow: hidden;
    color: #000000;
    display: inline-flex;
    z-index: 9;
}

.df-rating__placeholder {
    color: grey;
    position: relative;
}

4. Update the Doofinder Script:

The final step involves configuring the Doofinder script with the necessary function to display product reviews. Please take note of the 'XX' in the dfLayerOptions variable, and be sure to replace these placeholders with the values corresponding to your store settings.

Once the script is ready, insert it into your HTML code or replace the existing Doofinder script. Ensure that you have only one Doofinder script in your HTML.

const UpdateCardHook = {
  mounted() {
    this.changeResults = () => {
  const dfCount = document.getElementsByClassName('dfd-rating__count');
  const dfRating = document.querySelectorAll('.dfd-card-rating');

  for (let i = 0; i < dfRating.length; i++) {
  let dfRatingStar = dfRating[i].title;  
  dfRatingStar = (dfRatingStar / 5) * 100;
  dfRating[i].childNodes[1].style.width = dfRatingStar + "%";
  if(dfRatingStar == 0){
    dfRating[i].hidden = true;
  }
  };

//The following block will be needed if you are indexing the number of reviews
  for (let i = 0; i < dfCount.length; i++) {  
  let dfCountValue = dfCount[i].title;  
  if(dfCountValue == 0) {
  dfCount[i].hidden = true;
  }
  }
//End of block for number of reviews

  }
  },
  updated(){
  this.changeResults();
}
};

  const dfLayerOptions = {
    installationId: 'XXXX-XXXX-XXXX',
    zone: 'XX',
    hooks: {
    Carousel: UpdateCardHook,
    Results: UpdateCardHook,
    Layer: UpdateCardHook
  }    
  };


  (function (l, a, y, e, r, s) {
    r = l.createElement(a); r.onload = e; r.async = 1; r.src = y;
    s = l.getElementsByTagName(a)[0]; s.parentNode.insertBefore(r, s);
  })(document, 'script', 'https://cdn.doofinder.com/livelayer/1/js/loader.min.js', function () {
    doofinderLoader.load(dfLayerOptions);
  });
</script>

5. Locate and Modify the Doofinder Script:

If you're using the Doofinder plugin for WordPress, Shopify, or BigCommerce, modifying the Doofinder script is a straightforward process:

  • For WordPress, locate the script in the Doofinder plugin configuration.
  • In Shopify, find the script in your theme code under the doofinder-script-tag.liquid fragment.
  • For BigCommerce, access the script in your BigCommerce panel under Storefront > Script Manager.

For other platforms, manual insertion of the script into your HTML code is necessary. Ensure you disable the layer display from the plugin configuration to prevent a duplicated script.

Have any doubts or questions? To contact our Support Team, simply log in to your Doofinder admin panel. Click on 'Help' in the top blue bar, then select 'Contact our Support Team’.

If you're already logged in, you can reach support by clicking here.

We're here to help!