


A Recommendations carousel is attached to your website with a CSS selector, which tells Doofinder which element of the page to place it on.
Placing a carousel takes two decisions: the page type where it appears, and its position within that page. This article covers both, and the best practices for choosing a selector yourself.
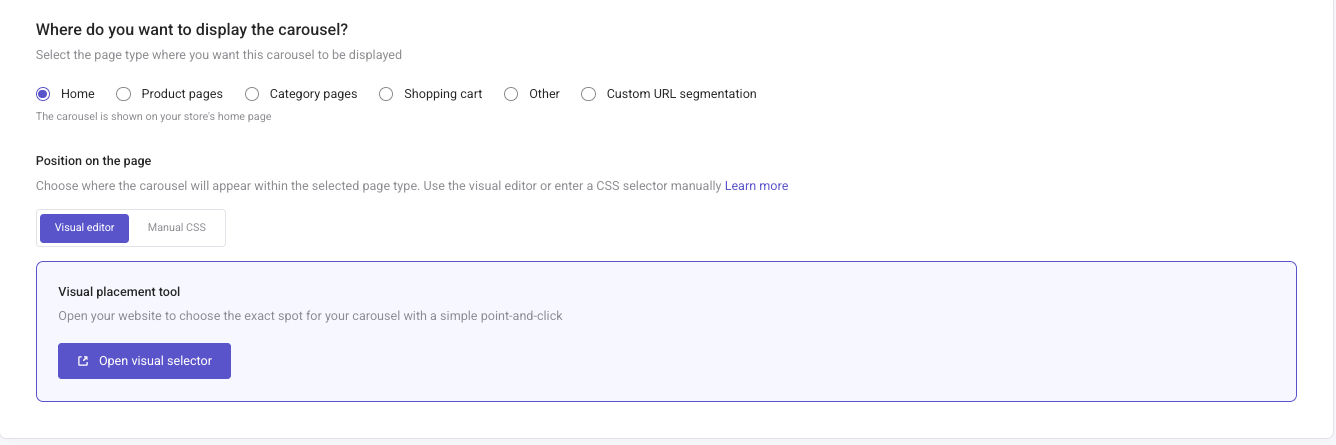
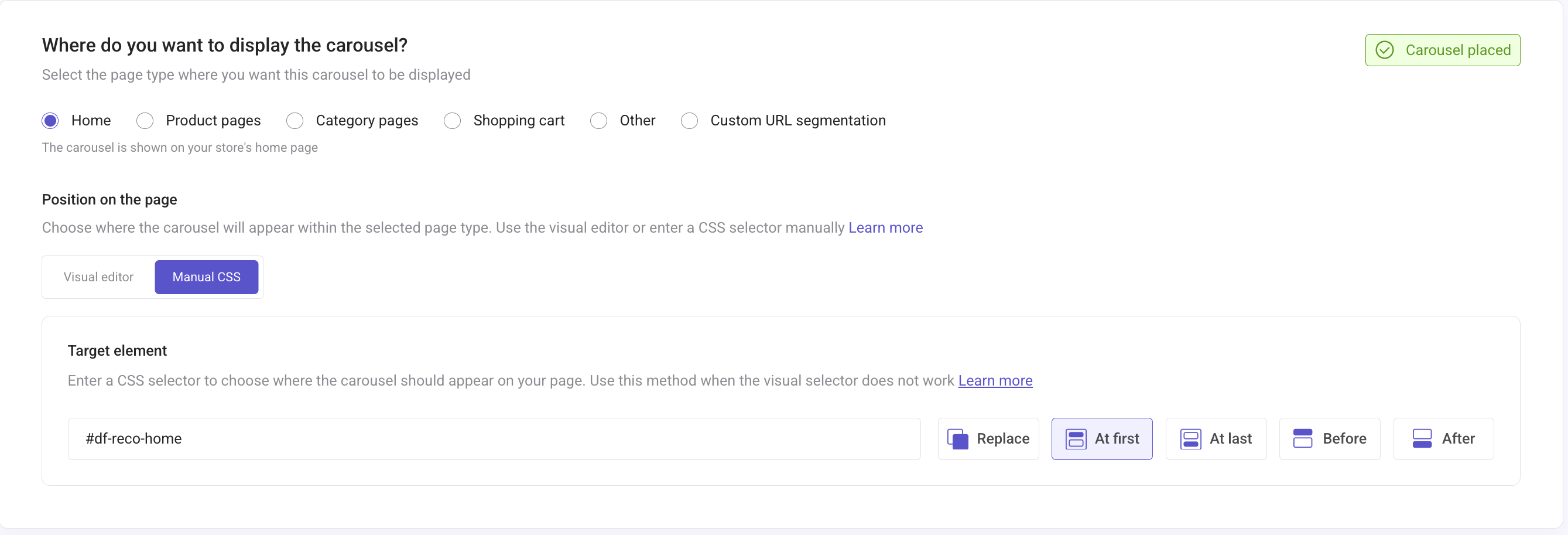
Where do you want to display the carousel?
Choose one page type. The options are exclusive, so selecting one clears the previous choice.
| Page type | Where the carousel is shown |
|---|---|
| Home | Your store's home page |
| Product pages | Your product detail pages |
| Category pages | Your category listing pages |
| Shopping cart | Your shopping cart page |
| Other | Any page that has the target element |
| Custom URL segmentation | Only the pages matching the URL rules you write |
The carousel appears where two conditions are met: the page is of the selected type, and the page contains the target element. A target element that exists on several pages shows the carousel on all of them, as long as they match the page type.
Custom URL segmentation replaces the page types. Selecting it unsets Home, Product pages, Category pages, Shopping cart and Other, and the carousel is then limited by your URL rules alone.
Custom URL Segmentation
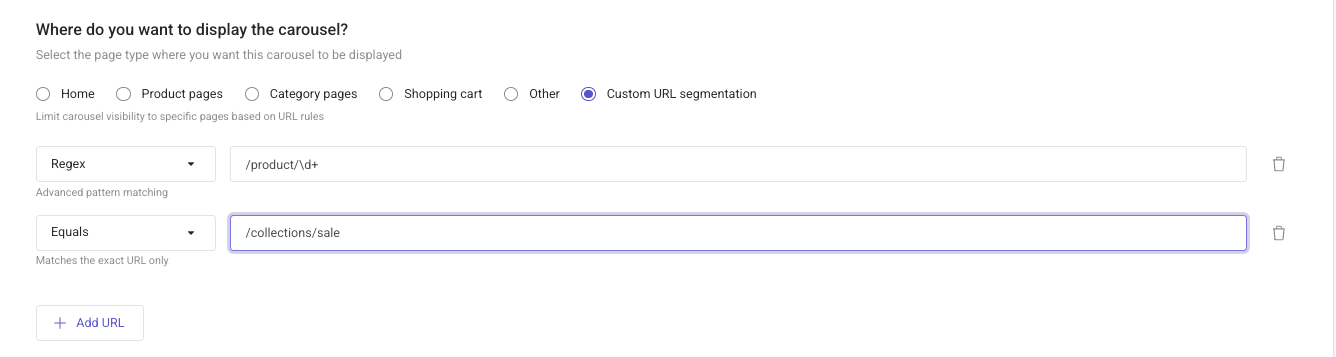
Select Custom URL segmentation to limit the carousel to specific pages through URL rules instead of a page type.
Each rule is an operator and a value:
| Operator | Matches |
|---|---|
| Contains | Any part of the URL |
| Equals | The exact URL only |
| Starts with | The beginning of the URL |
| Regex | A regular expression, for advanced pattern matching |
Click Add URL to add a rule. A carousel takes up to 10 rules.
Position on the Page
Once the page type is set, choose where on the page the carousel goes. Under Position on the page there are two tabs, and either one sets the Target element, which is the CSS selector the carousel uses:
- Visual editor: click Open visual selector to see a preview of your website and choose the spot with a point and click. The steps are under Visual Placement.
- Manual CSS: type the CSS selector yourself. The steps are under Placing the Carousel with Manual CSS.
Visual Placement
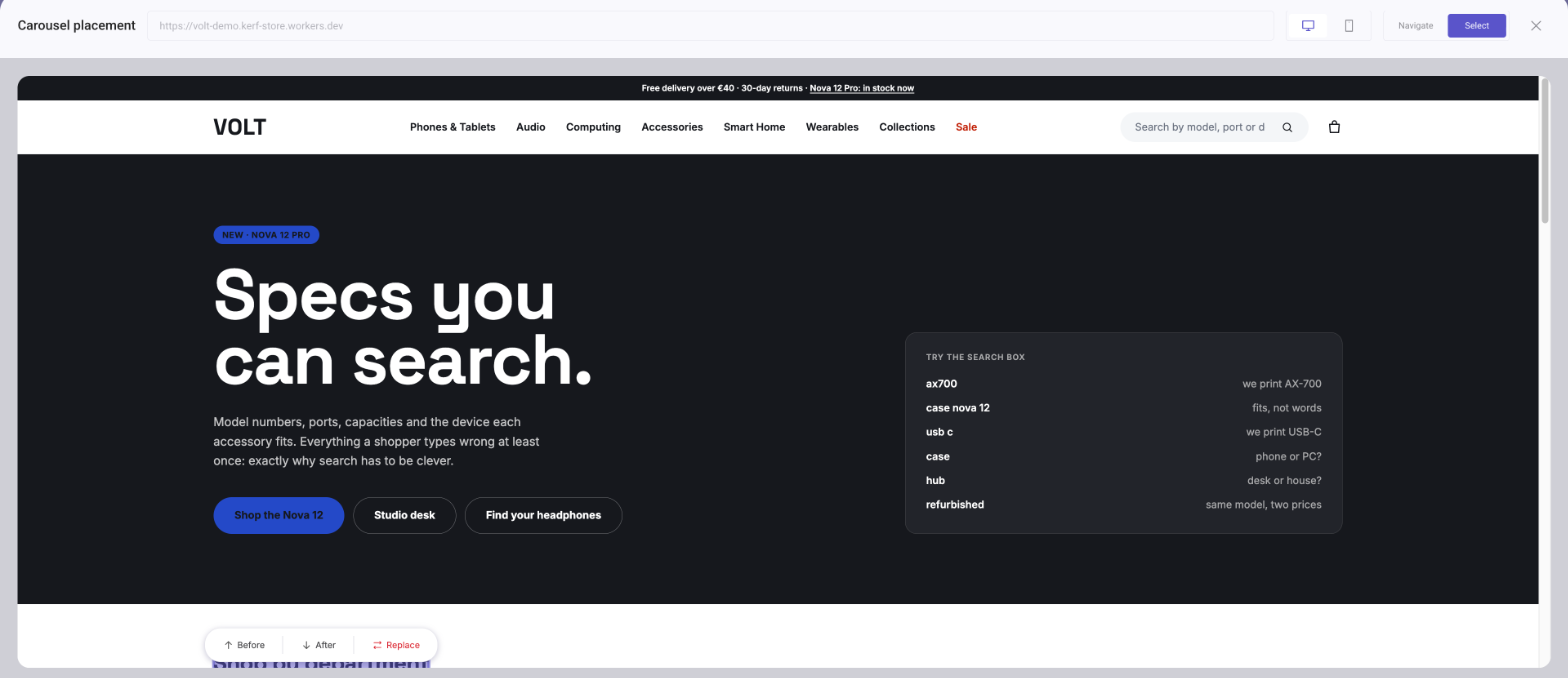
Once you click on Open visual selector a new window will pop up, and you will see the following options:
- Carousel placement: the URL of the page you are working on. Type another URL if the default is not the one you expect. You must be in Navigate mode to edit it.
- Desktop or mobile view, with the two icons to the right of the URL.
- Navigate: browse through your web to find the place where you want to add the carousel.
- Select: hover over your web elements and select the exact spot where to add your carousel. Upon click, a small menu offers Before, After and Replace for that element. The Manual CSS tab adds At first and At last to those three.
The bar at the bottom shows the Target element picked. Click Confirm placement to keep it.
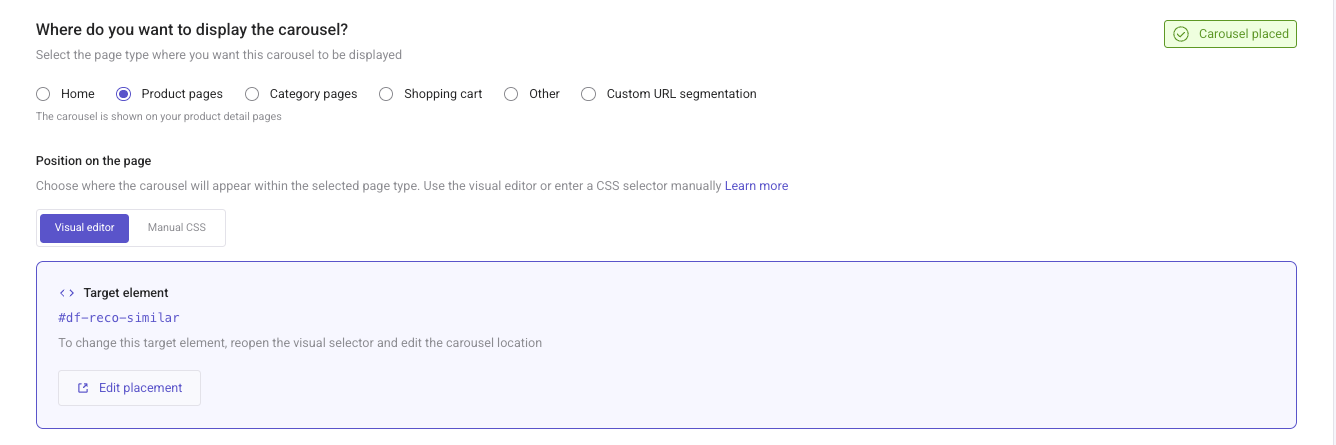
Once selected, a green confirmation badge will appear stating “Carousel placed”, and the Visual editor tab shows the Target element in use, with an Edit placement button that reopens the selector.
Placing the Carousel with Manual CSS
Use the Manual CSS tab to type the selector yourself. If you placed the carousel with the visual selector, you do not need these steps.
Find the Selector in Your Browser
-
Click anywhere on your webpage with the right button and click inspect.
-
Select the box on the toolbar and inspect the page to find where you would like to place the Recommendations Carousel. Choose an element that works for you.
-
Once you know where to place it, search for the selector in the HTML code. The element you pick will be colored on the page.
-
Unfold the element to find the selector and choose ID (
#product-list) or class (.product-list). If it corresponds to the size and place you would like for the Recommendations Carousel, copy it.
Paste It into the Carousel
-
In your carousel, open Position on the page > Manual CSS and paste the selector into the Target element field.
-
Choose how the carousel is inserted relative to that element. It can Replace the element, it can be placed At first or At last within the element, or Before or After the element.
-
An insertion method is required. While none is selected, the panel shows "At least one insertion method must be selected" and the carousel cannot be saved.
-
Try the desired position until obtaining the desired result, then Save.
Note that you can choose multiple CSS selectors. If the first one you use doesn't work, Doofinder Recommendations will automatically use the next one.
For example, if you enter: .page,body>footer in the Target element field and .page doesn't exist, the selector body>footer will be used instead. However, if the first selector you choose, such as .page does exist, Doofinder Recommendations will use that one, as it always uses the first available selector.
How to Choose a CSS Selector for Recommendations - Best Practices
Read the following do's and don'ts to choose the correct selector and determine the best carousel placement for your eCommerce goals.
✓ Do's
- Use browser developer tools > Inspect Element to find the exact class or ID for your store’s layout.
- Ensure the selector is specific enough to avoid conflicts with other elements.
- Choose stable elements: Select a wrapper div or a container that is unlikely to change when the website updates.
- Use IDs when possible: If an element has an ID (e.g.,
#product-list), it’s usually more reliable than a class (.product-list). - Test different positions to determine the most effective placement for user engagement.
✕ Don'ts
- Avoid too specific selectors: A selector like
div.container > div.row > div.col-md-6might break if the store updates its layout. - Don't use autogenerated class names: If a class name looks like
.abc123-xzy456, it’s likely dynamic and may change. - Avoid using XPaths unless necessary: They are often fragile and harder to maintain than CSS selectors.
Choosing a CSS Selector for Different Page Types
Choose the Best CSS Selector for Your Home Page, Product Page, Category Page, Shopping Cart Page, and Specific Page. Keep reading to discover the most relevant elements that align with each page type's criteria.
Home Page - CSS Selector
The home page typically consists of a main content wrapper containing elements like banners, featured categories, and product grids. It is best to place the carousel within a larger structural container.
- Recommended Selector:
- Select a high-level container such as
.main-content,.homepage-container,#MainContent, or#footer. - Or a direct child of the main layout wrapper:
.main-content .featured-products,#MainContent .content-for-layout.
- Select a high-level container such as
Product Page - CSS Selector
Product pages follow a structured layout where product images, descriptions, pricing, and add-to-cart buttons are enclosed within a .product-detail or similar container. Carousels are typically used for related products, recommendations, or upsells and should be placed near these sections.
- Recommended Selector:
- Target the
.related-productssection: .product-page .related-products. - Or position the carousel after the product details block:
#main .product-container.js-product-container. - Or you may want to place the carousel right after another key element, such as the product description, details, or price section:
#product-comments-list-header.
- Target the
Category Page - CSS Selector
Category pages use a grid-based layout with a category banner, filters, and product listings. Carousels should be placed either below the category banner or above/below the product grid to highlight featured items, best-selling, or new arrivals.
- Recommended Selector:
- Target the category wrapper:
#category,,.category-page .product-grid. - Or place the carousel adjacent to the product list, or a featured section within the category:
#category-13.category.
- Target the category wrapper:
Shopping Cart Page - CSS Selector
The cart page consists of a cart summary and checkout section, often wrapped in a .cart-container. Carousels should be placed near upsell/cross-sell suggestions, usually found below the cart contents or next to the checkout button.
- Recommended Selector:
- Target a stable cart summary container:
.cart-summary.
- Target a stable cart summary container:
Specific Pages - CSS Selector
Specific pages (landing pages, custom promotional pages, blogs) have unique structures and might not follow a standard layout, therefore placement varies depending on the layout and content. The carousel should target an appropriate container relevant to the page’s purpose.
To find the best selector for specific pages you can either look for a CSS selector specific to the section or page where you want to insert the carousel; or use a universal selector, one that you can find on all pages, in combination with another identifier.
Using a Specific CSS Selector
This approach targets and identifies a dedicated section inside these unique structures, where the carousel could be inserted.
- Recommended Selector:
- Target a specific custom wrapper:
.product-grid. - Or place the carousel relative to a key content block, identify a unique class or ID associated with the specific page:
#landing-page > .product-grid.
- Target a specific custom wrapper:
Using a Universal CSS Selector
This approach uses a selector that exists on all pages, such as #footer. Then, you apply additional conditions to make sure the carousel appears only on the desired page. Since #footer is a global element, you need to combine it with a page-specific class, body attribute, or URL-based identifier.
- Recommended Selector:
- Combine
#footerwith a page-specific identifier found in the<body>tag or another element unique to that page. If the<body>tag has a class indicating the current page (e.g.,body.product-page):.product-page #footer. - If your site adds an ID to the
<html>or<body>tag dynamically based on the URL (e.g.,id="page-123"), you can use:#page-123 #footer.
- Combine
Display Recommendations in Different Devices
If you want to display Recommendations differently on desktop or mobile, you can do it by using different CSS selector.
To position the carousel on different placements according to the device, follow one of these options:
Modify Unique Classes in Your HTML for Each Device.
For example, the product page for desktop may have a div similar to this one:
<div class="dfd-recommendation-widget-desktop"> </div>
Therefore, on pages where this selector can be identified, the carousel will be displayed. In this case, on product pages for desktop.
Since this specific selector won't be found for mobile, the Recommendations carousel will not be visible.
Media Query to Hide The Carousel
Alternatively use a media query to hide the carousel.
- Configure your Recommendations carousel.
-
After configuring the Recommendations carousel, the following CSS rules can be applied.
Note that the following rules are examples and you will need to modify them to your needs.
-
To hide the carousel on mobile devices:
@media only screen and (max-width: 768px) {.dfwidget-host {display: none;}} -
To hide carousel on desktop devices:
@media only screen and (min-width: 1024px) {.dfwidget-host {display: none;}}
-
-
To use them, go to Recommendations > Appearance > Advanced configuration > CSS and click Customize.