Overview
Under the Account Section of your Admin Panel, you can find information about your account.
On the left-side menu, you’ll see the following sections:
- My Subscription: View your current plan details, features, and limits, or explore upgrades.
- Usage: Monitor your usage to manage resources effectively.
- Billing Information: Manage your payment methods and information.
- Invoices: Review payment history and invoices.
- User: Under this section you will find:
- Profile: You’ll be able to modify your profile information.
- Team Members: Ensure your team has the required access to the Doofinder Admin Panel assigning determined roles.
- API Keys: Create API Keys for enhanced management API requests
My Subscription
In this panel, you will find your current plan details, features, and usage consumption. Keep reading to learn about each part of the My Subscription panel.
To discuss personalized plans, contact us through our contact form. If needed, log in to your Doofinder Admin Panel. Click on “Help Center” in the left-side menu or in the top bar, then select “Contact our Support Team”.
You can find our current plans here.
Your Plan
When accessing Account > My Subscription, you will find all Doofinder products and their usage under your contracted plan, which details you can see in the Plan Details section of this article.
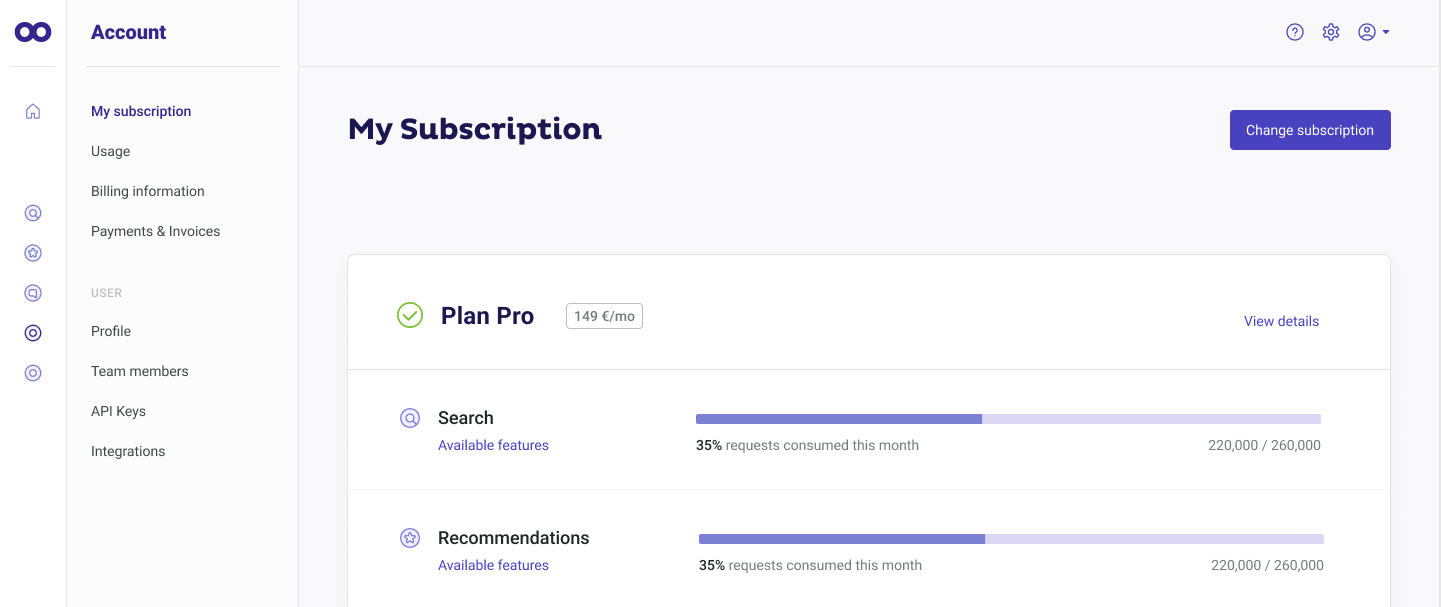
Alongside your plan, you can see its billing amount and the billing period, plus a button displaying "View details".
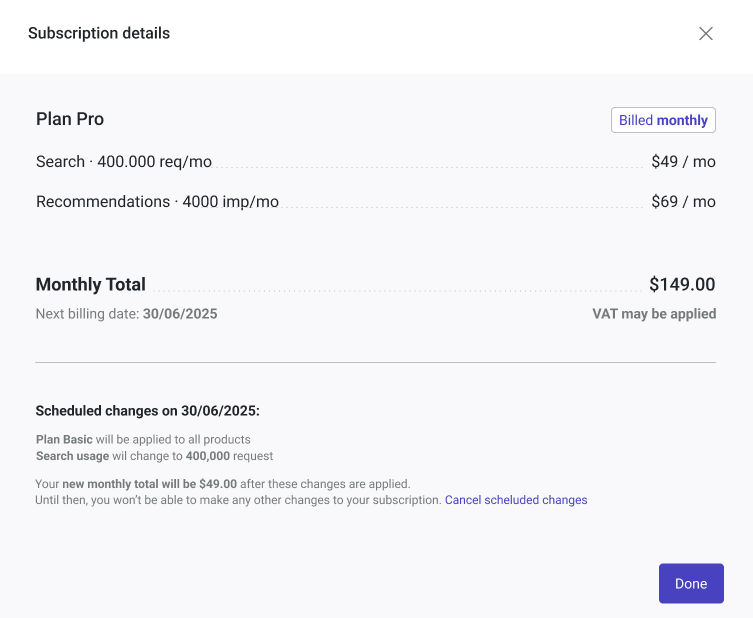
By clicking “View details”, a pop-up will appear. Inside, you’ll find all the specific information about your current plan, including the billing date and any scheduled changes.
Once you are back in the main panel, you'll see a "Change Subscription" button in the top-right corner of the panel, which allows you to modify your plan.
Plan Details
Under My Subscription your current and active subscription will be visible with your current plan details. That means:
- You can examine the available features of the product and the plan you are in by clicking “Available features”.
-
You can monitor your usage for each product with just a glance. Next to each product, you’ll see both the available and consumed requests or impressions, making it easy to track usage and adjust your plan as needed, such as upgrading to a higher plan.
The number of requests or impressions, the percentage of usage, and the plan limit (e.g., 250,000 / 280,000) are always displayed.
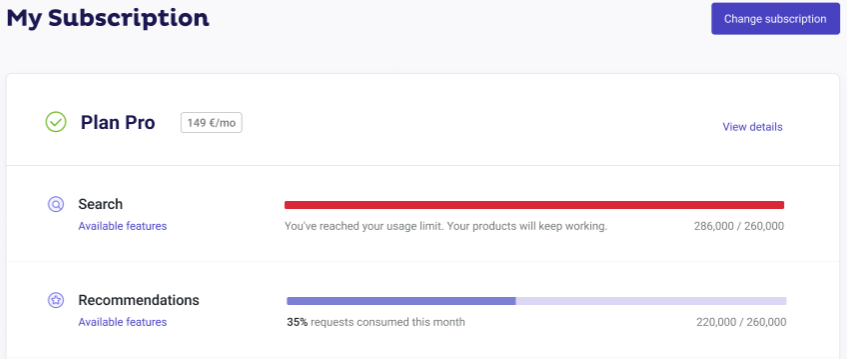
- When usage is within limits and not close to being exceeded, the product usage bar will appear in purple. Here’s a visual example:
- When usage is close to the limit or has been exceeded, the product bar appears in red, highlighting the need for attention, or a plan upgrade. Also, the following message will appear instead of the usage percentage: "You've reached your usage limit. Your products will keep working". Here’s a visual example:
Initial Trial and Subscription
We have enhanced the trial experience to better reflect the functionalities available per plan in Doofinder.
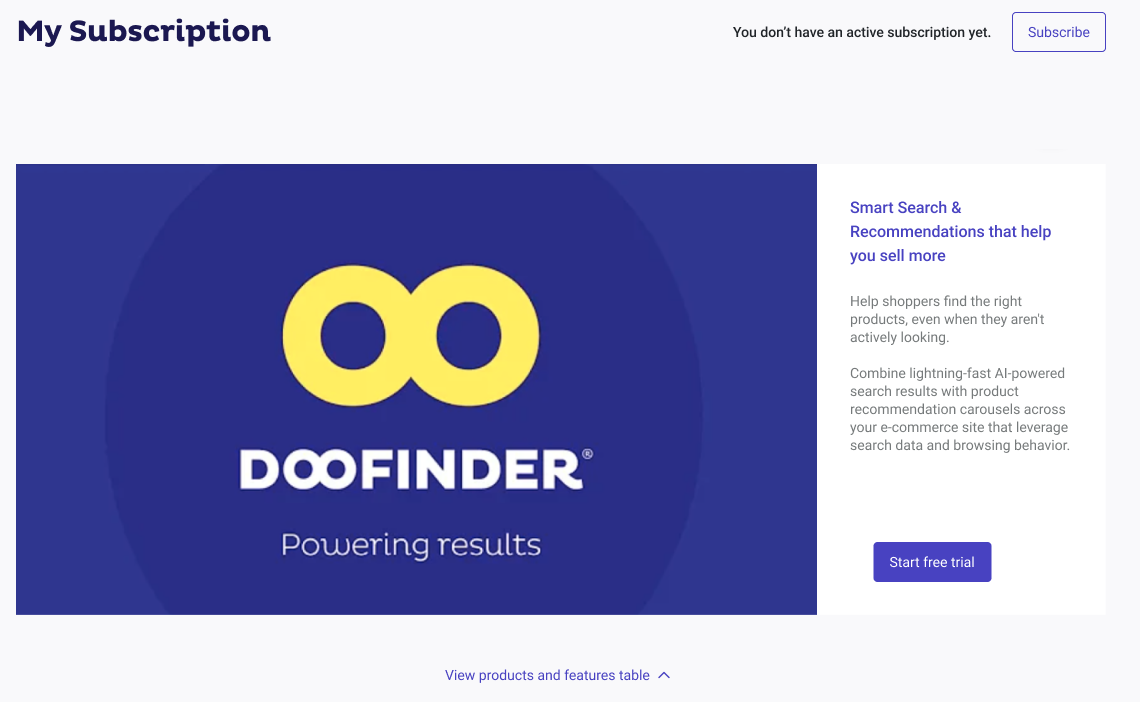
If you are new to Doofinder, and you have created an account but do not yet have a contracted plan, you can start by initiating a trial by clicking the “Start Free Trial” button. Here’s how to get started:
-
Under Account > My Subscription, you will find the option to start a new trial, allowing you to explore the various Doofinder products. You can also access it from the banner displayed on the top of the page.
The trial lasts 15 days, and users are now able to select the desired plan to trial prior to initiating it.
No payment is required during the trial.
To explore the functionalities and features of each plan, go to the bottom of the panel before starting your trial. There, you’ll find the "View products and features table" tab. Click it to display each plan features.
-
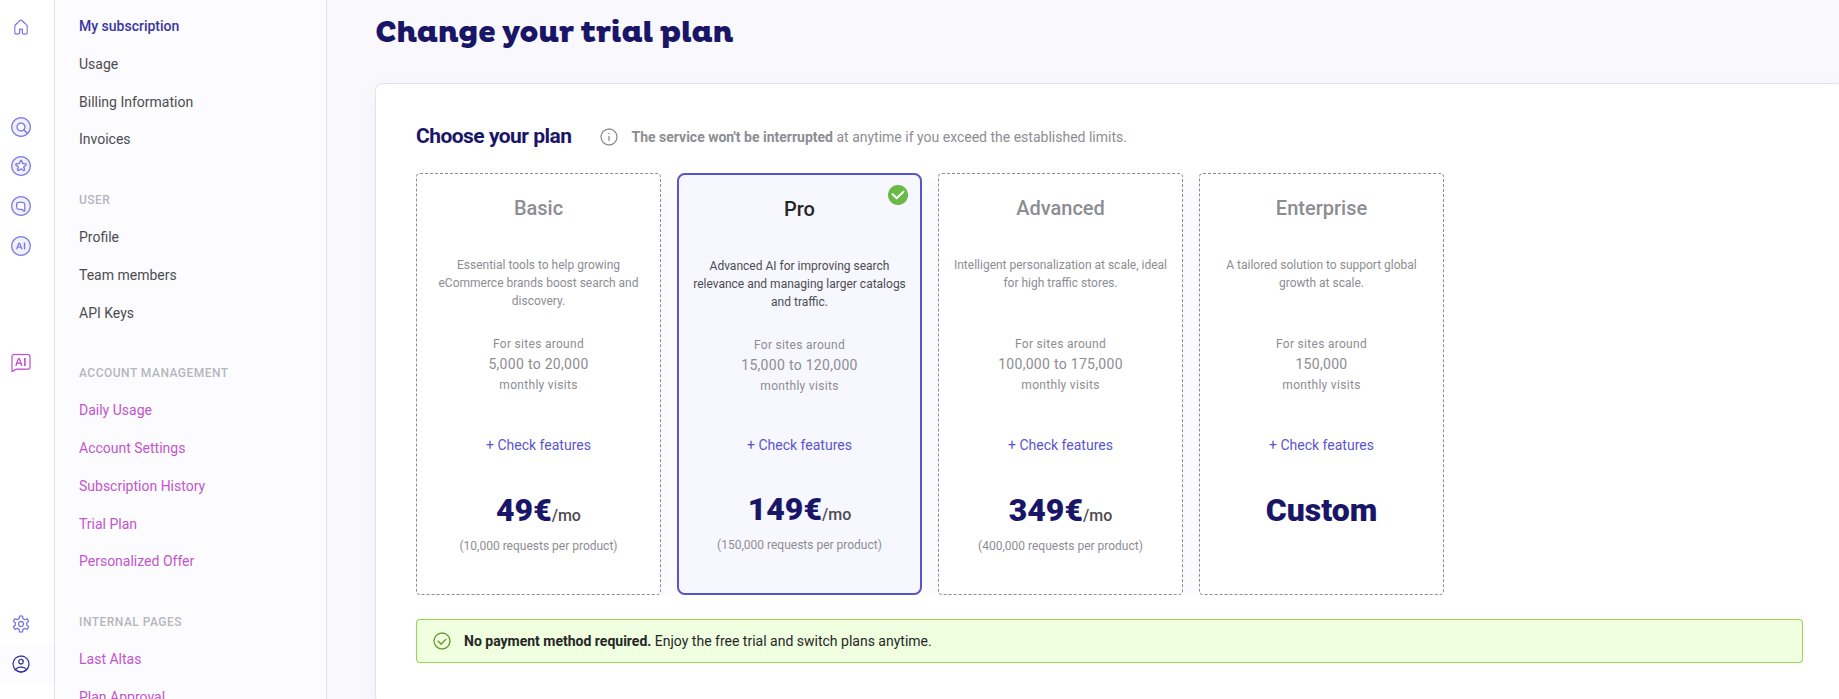
You will then be directed to the plan selection table, where you may choose the option that best meets your needs:
-
Once the trial starts, in My Subscription shows a yellowish clock icon and the remaining days and status:

You may change the trial plan at any time without resetting the trial period by clicking on “Change trial plan”:

-
If you decide to subscribe to a plan before the trial ends, click on the “Subscribe” button on the top right-hand side, or wait until the trial ends. Until then, nothing will be charged. If you click on “Subscribe”, you will be automatically redirected to the purchase flow. The remaining trial days will stay unchanged.
Once the trial expires, the account returns to the initial “free” plan state.
-
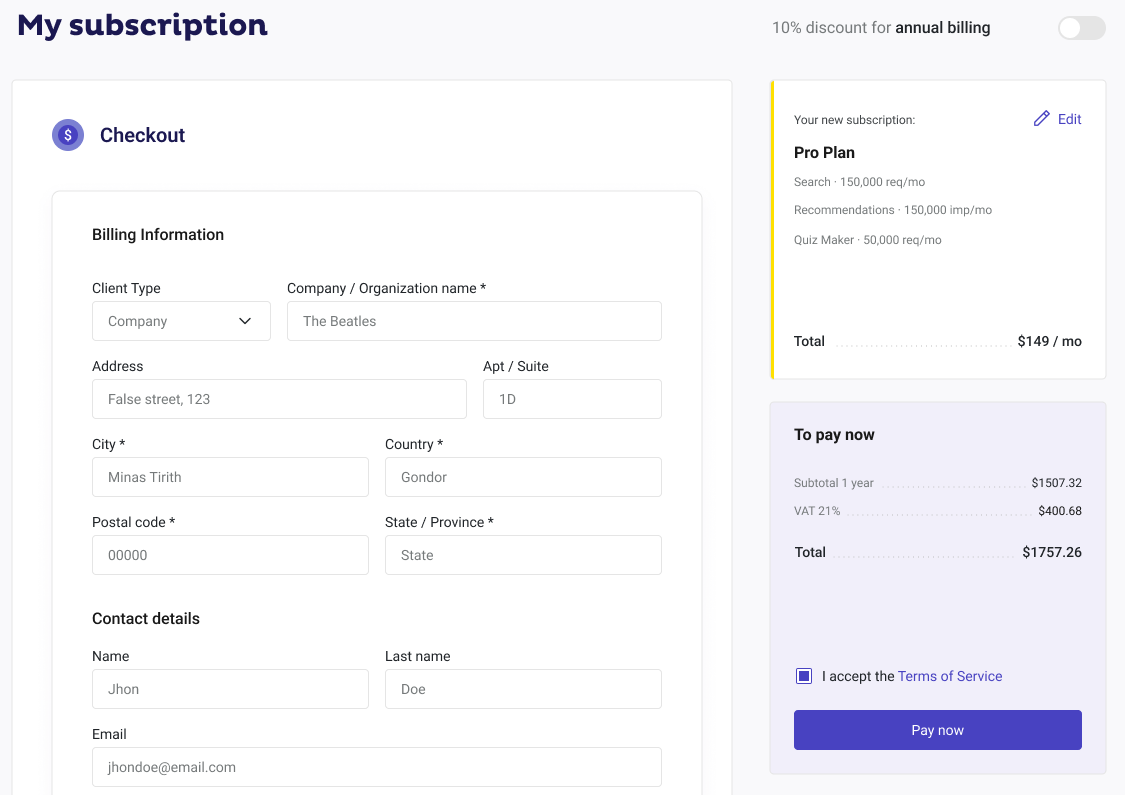
In both cases, once you enter the purchase flow, start by selecting a plan in the Choose a plan panel. Pick the option that best matches your desired features and expected usage. After choosing your plan, click the “checkout” button at the bottom of the panel.
-
In the checkout panel, fill in the billing information for payment.
-
Once finished, accept the terms of service, and click on “Pay now” to proceed with payment. When finalized, a “Thank You” page will appear.
Lastly, configure the products and features you haven’t configured during the trial and enjoy the benefits of Doofinder in your eCommerce.
This process does not apply to Shopify Billing users.
How to Change My Subscription
You can update your subscription by navigating to the Admin Panel, on Account > My Subscription. The process has two steps: selecting a plan and completing the checkout, just as you did when subscribing for the first time.
- Click the “Change subscription” button located at the top right corner of the panel. The Choose your plan panel will appear. Select the new plan that best suits your desired features and usage consumption.
- On the right side of the panel, you will see your new subscription. Remember, you can examine the features for each plan by clicking the “+ Check features” button in each plan details.
- Click the “checkout” button to proceed to payment.
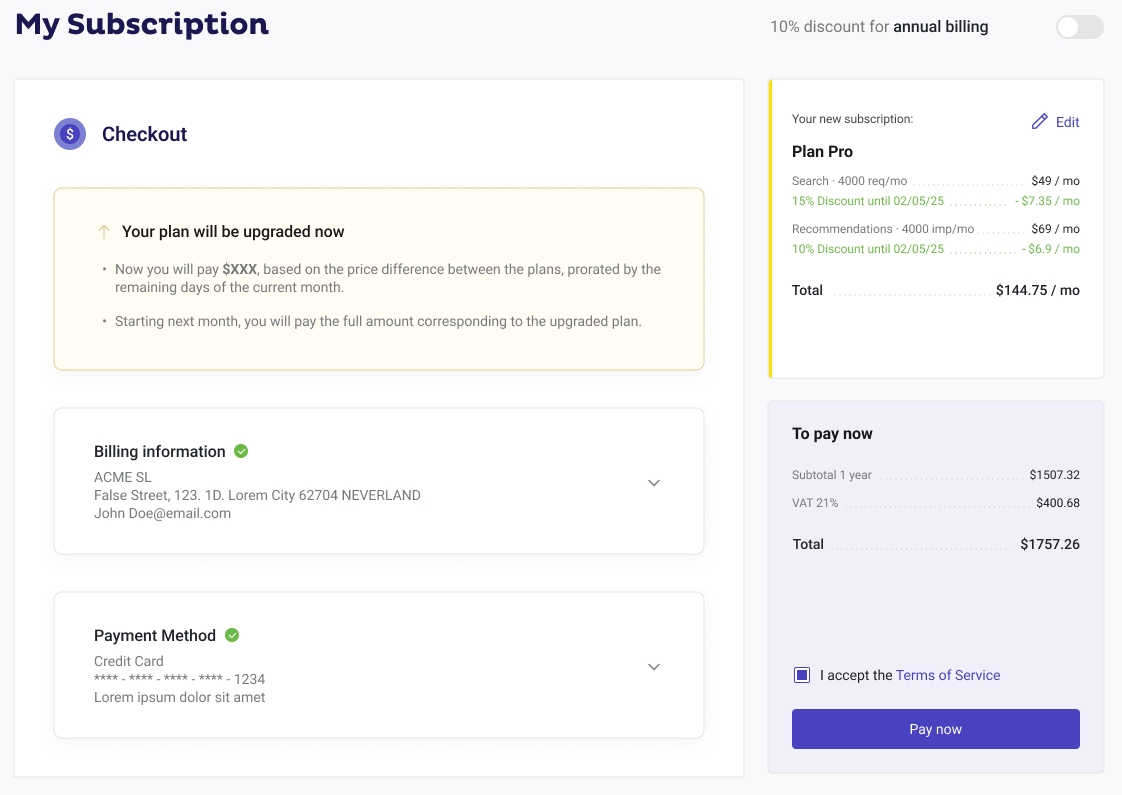
Check your new subscription. On the right, review the updated details. In the center, a message shows the payment amount and other information related to your changes.
Upgrades apply immediately. Downgrades apply on your next billing date.
- Accept terms of service and click “Pay now” to proceed with the changes.

Your billing information and payment method will appear here. If you need to update them, click on the arrow to unfold the billing and payment settings.
Cancel Subscription
-
To cancel your subscription, go to Account > My Subscription, click the gray “Cancel subscription” link at the bottom, and follow the cancellation steps.
-
Complete the pop-up questions, then click “Cancel subscription”.
Your cancellation applies at the next billing period. Until then, you will continue to enjoy all features in your plan.
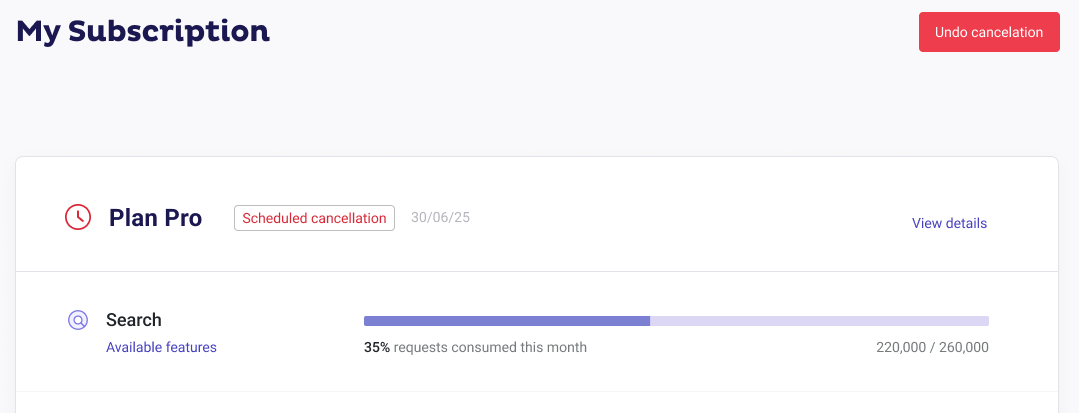
In the My Subscription panel, a scheduled cancellation notice will appear until cancellation takes effect.
Undo Cancellation
To revert, click “Undo cancellation” (top right or bottom left of the panel). A pop-up will ask you to confirm.
This option is available until your cancellation date.