What is Field Name Mapping?
Field name mapping is the process of linking or aligning the names of fields from one data source or system to another, especially when they have different naming conventions or structures.
If you are using a custom data feed to index your products, the field names in your feed may differ from (or may not exist in) Doofinder’s default field names.
If you are using the Google Shopping (GS) feed, your field names do not need to match GS specifications.
To successfully merge or integrate fields, you will need to use Doofinder’s field name mapping:
How to Add Field Name Mappings
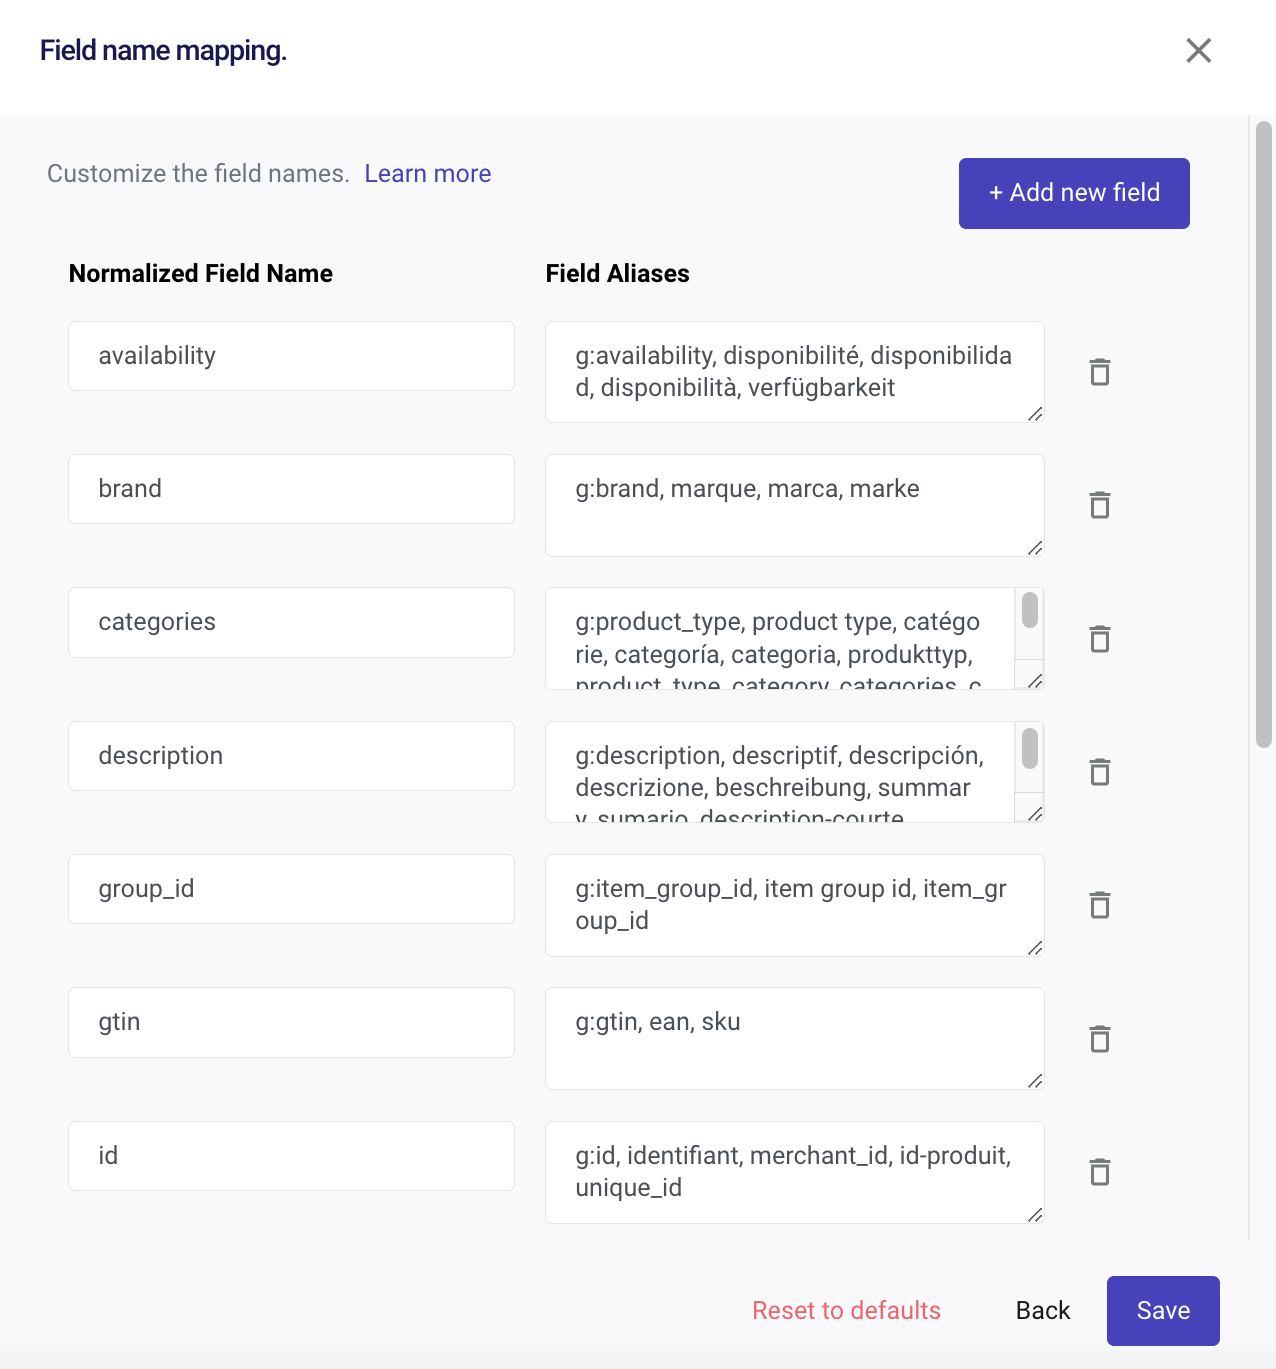
You can access the Field name mapping section through the Admin Panel. Here’s how:
- In your Admin Panel, go to Configuration > Search Engines > click on "See indices" > Indices.
- On the Product tab, click the three dots next to the Product source. A dropdown menu will appear.
- Click on Field name mapping.
- The Field Name Mapping pop-up will appear with two sections:
- Normalized Field Name: indicates how the field is indexed in Doofinder.
- Field Aliases: indicates how the field appears in your feed.
In the Field Aliases section, enter the field names used in your data feed that should correspond to Doofinder's normalized field names (if they are not already listed).
For example:
- Your product data feed uses
g:availability, marque, product type. - While Doofinder uses and expects
availability, brand, categories.
- Your product data feed uses
- Save and index.
During the next indexing process, Doofinder will apply the new aliases to retrieve and display the relevant data from your feed.
How to Add New Fields
You can also add new fields to index fields from your feed not covered in Doofinder’s default settings.
- Click the "+Add new field" button.
- Under Normalized Field Names, add the new field you would like to index in Doofinder.
- Under Field Aliases, add the names of the fields from your data feed that should be mapped to the normalized field name.
Field Name Mapping Types
Doofinder supports two types of field mapping:
Basic Field Mapping
Used for mapping simple fields:
idfromproduct_idtitlefromnamepricefrombase_price
xml in-feed field example:
<color> black </color>
Deep Field Mapping
Used for mapping nested attributes within an object or list:
colorfromattributes.colortypefromcustom_fields.specifications.typeattributesfromcustom_fields.attributes
xml in-feed field example:
<attributes>
<color> black </color>
<size>L</size>
<category>clothing</category>
</attributes>
With deep field mapping, you can access and extract attributes from their parent objects and create or assign aliases for them, just like first-level fields. This means they are no longer treated as nested attributes and can be used in filters, sorting, or rules.
How Does Deep Mapping Work?
There are three ways to map nested attributes:
- Nested Fields
To access any nested attribute and use it as a first-level field, reference the full attribute path (there is no attribute level limitation):
custom_fields.specifications.type
- Indexing Arrays
To retrieve the first item from a list or array, use square brackets with a number (starting at 0):
images.[0]
- Filtering Arrays
To target specific items based on attribute values, use the following format:
attributes.[name=color].value
This fetches the value of the item where name=color.
Your field name mapping will look like this:
![Field Alias and Normalized Field Name example. Field Alias is custom_fields.images.[0], Normalized Field Name is main_image](/images/deep-mapping-eg.png)
Map all the nested values of an object that you want to use. Once saved and indexed, only the configured nested values will appear in the index, the remaining values, including the parent object itself, will no longer be included.
Learn by Example - How to Map Nested Values with Deep Field Mapping
Imagine you have a product data feed that looks like this:
{
  "id": "12345",
  "name": "Premium Wireless Headphones",
  "price": 299.99,
  "custom_fields": {
    "attributes": [
      {
        "name": "color",
        "value": "black"
      },
      {
        "name": "warranty",
        "value": "2 years"
      },
      {
        "name": "brand",
        "value": "AudioTech"
      }
    ],
    "specifications": [
      {
        "type": "battery_life",
        "value": "30 hours"
      },
      {
        "type": "connectivity",
        "value": "Bluetooth 5.0"
      }
    ],
    "images": [
      "https://example.com/headphones-1.jpg",
      "https://example.com/headphones-2.jpg",
      "https://example.com/headphones-3.jpg"
    ],
    "variants": [
      {
        "sku": "WH-001-BLK",
        "price": 299.99,
        "stock": 50
      },
      {
        "sku": "WH-001-WHT",
        "price": 299.99,
        "stock": 25
      }
    ]
  }
}
You want to map:
-
The second image, using indexing: custom_fields.images.[1]
-
The Bluetooth 5.0 value using filter: custom_fields.specifications.[type=connectivity].value
Your field name mapping will look like this:
![With the example, the field name mapping section shows, the Normalized Field Names which are connectivity and main_image and the Field Aliases which are custom_fields.specifications.[type=connectivity].value and custom_fields.images.[1]](/images/field-aliases-deep-eg.png)
This is the feed output:
{
  "id": "product_id",
  "name": "title",
  "price": "base_price",
  "custom_fields.attributes.[name=color].value": "product_color",
  "custom_fields.attributes.[name=brand].value": "brand_name",
  "custom_fields.images.[1]": "main_image",
  "custom_fields.variants.[0].sku": "primary_sku",
  "custom_fields.specifications.[type=connectivity].value": "connectivity"
}
This is the output in Results Preview in the product information box:
{
  "product_id": "12345",
  "title": "Premium Wireless Headphones",
  "base_price": 299.99,
  "product_color": "black",
  "brand_name": "AudioTech",
  "main_image": "https://example.com/headphones-1.jpg",
  "primary_sku": "WH-001-BLK",
  "connectivity": "Bluetooth 5.0"
}
Always map all nested values you want to keep. Once indexed, unmapped values (and the parent object) will disappear from the index.
Troubleshooting
An Error Appears During First Indexation
To get your data feed properly indexed, Doofinder requires the ID and Title. If one or both of them have a field name in your feed that is not in the expected Field Aliases, Doofinder will not recognize it, and the index will deliver an error message such as this:
"Too much warnings. Last warning: id attribute(s) missing" See more details
You can use the Normalized Field Names section to fix this by setting the correspondence between the field name in the data feed and the normalized one. Once completed, save the changes.
The Layer Doesn’t Show Some Information in the Results
Doofinder should show the following fields in the results:
- image_link
- title
- price
- sale_price (if exists)
- link
If some of this data is missing, the problem could be a non-recognized field name in your feed. To fix it, detect the non-recognized field name and configure the alias.
Say, for instance, we need a title field sent to Doofinder. If the data you sent in the field is called product_name, you should customize the field title with the field product_name.
Depending on how the feed export is configured, you should know the name of this field from your feed.
Otherwise, you can open the feed and check it.
Deleting a normalized field name line will not remove the customized normalization or data. Doofinder will always apply the customized normalization in the background. Therefore, you cannot use this tool to hide data shown in the layer; for instance, you cannot remove the prices from the layer by deleting the aliases.
How to Recover an Object After Deep Field Mapping
If you have already mapped some nested values and want to add more but can’t recall which values are available (and you don’t have access to the full feed):
- Temporarily remove the mappings from that object in Field name mapping.
- Save and Index. The full object will reappear in your feed. Remember, they only disappear from the index.
- Review its structure and add the desired fields.
- Re-apply and apply new mappings and save.