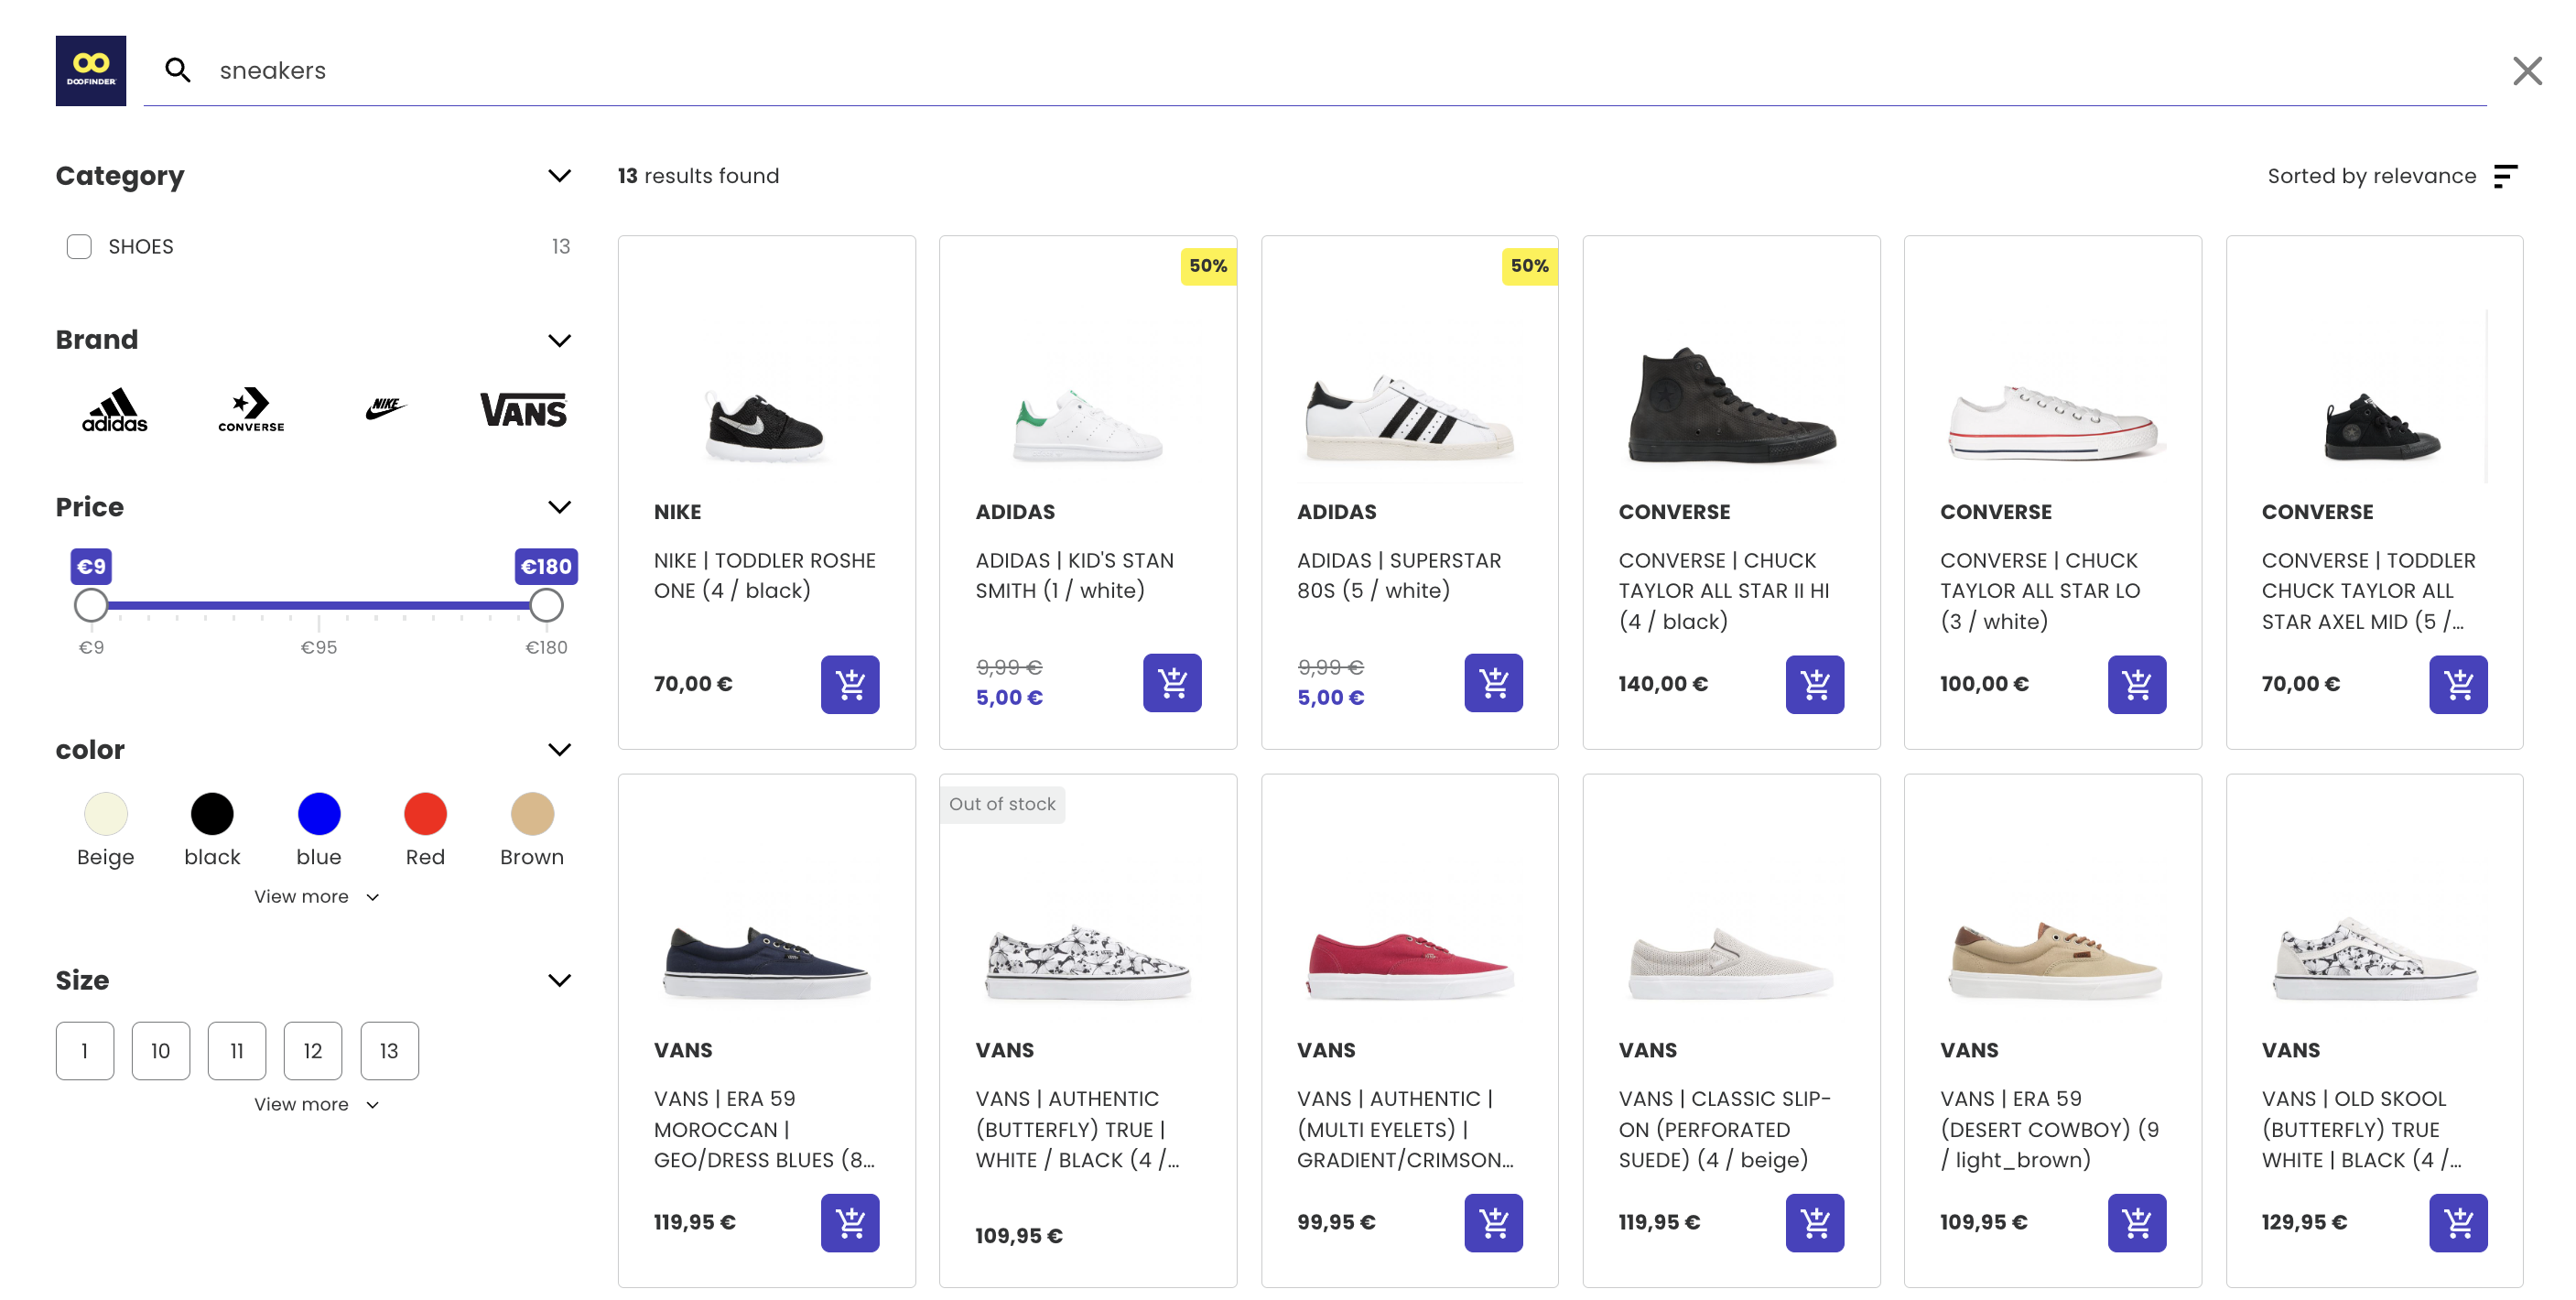
What is the Product Card?
The Product Card is the component responsible for showcasing product details within the Layer. Typically, it shows a product image, title, and pricing information. This component can be tailored in the Admin Panel to include additional details, such as product availability, discount percent information, and the add to cart button. Furthermore, it is completely customizable with HTML and template modifications, and there is also the option to style it with CSS (colors, fonts, etc.).
To learn more, visit our Appearance documentation.
You now have the flexibility to adjust the product card information to show more or less details based on your specific requirements. You can make these modifications within the Product Card Template section, as long as you have the correct information indexed.
The product card uses HEEx format — which is similar to HTML. If you wish to learn more about this, you can visit the HEEx documentation.
How to modify the Product Card
To customize the product card, you need to access the Product Card Template section. Before proceeding, carefully read the warning below:
Editing the Product Card template demands coding expertise and advanced HTML knowledge. Certain template modifications can drastically impact the layer and this may disrupt its functionality. Please note that our Technical Support Team has limited resources for coding assistance, and there are strict rules regarding providing coding advice, with no support offered for such customizations. We strongly recommend backing up your existing Layer and CSS rules before making any adjustments. You can create a second Layer to test template modifications, and it's advisable to save the modified template and CSS in a .txt file for reference. Keep in mind that once modified or deleted, the original Layer cannot be restored.
To access your Product Card Template, follow these steps:
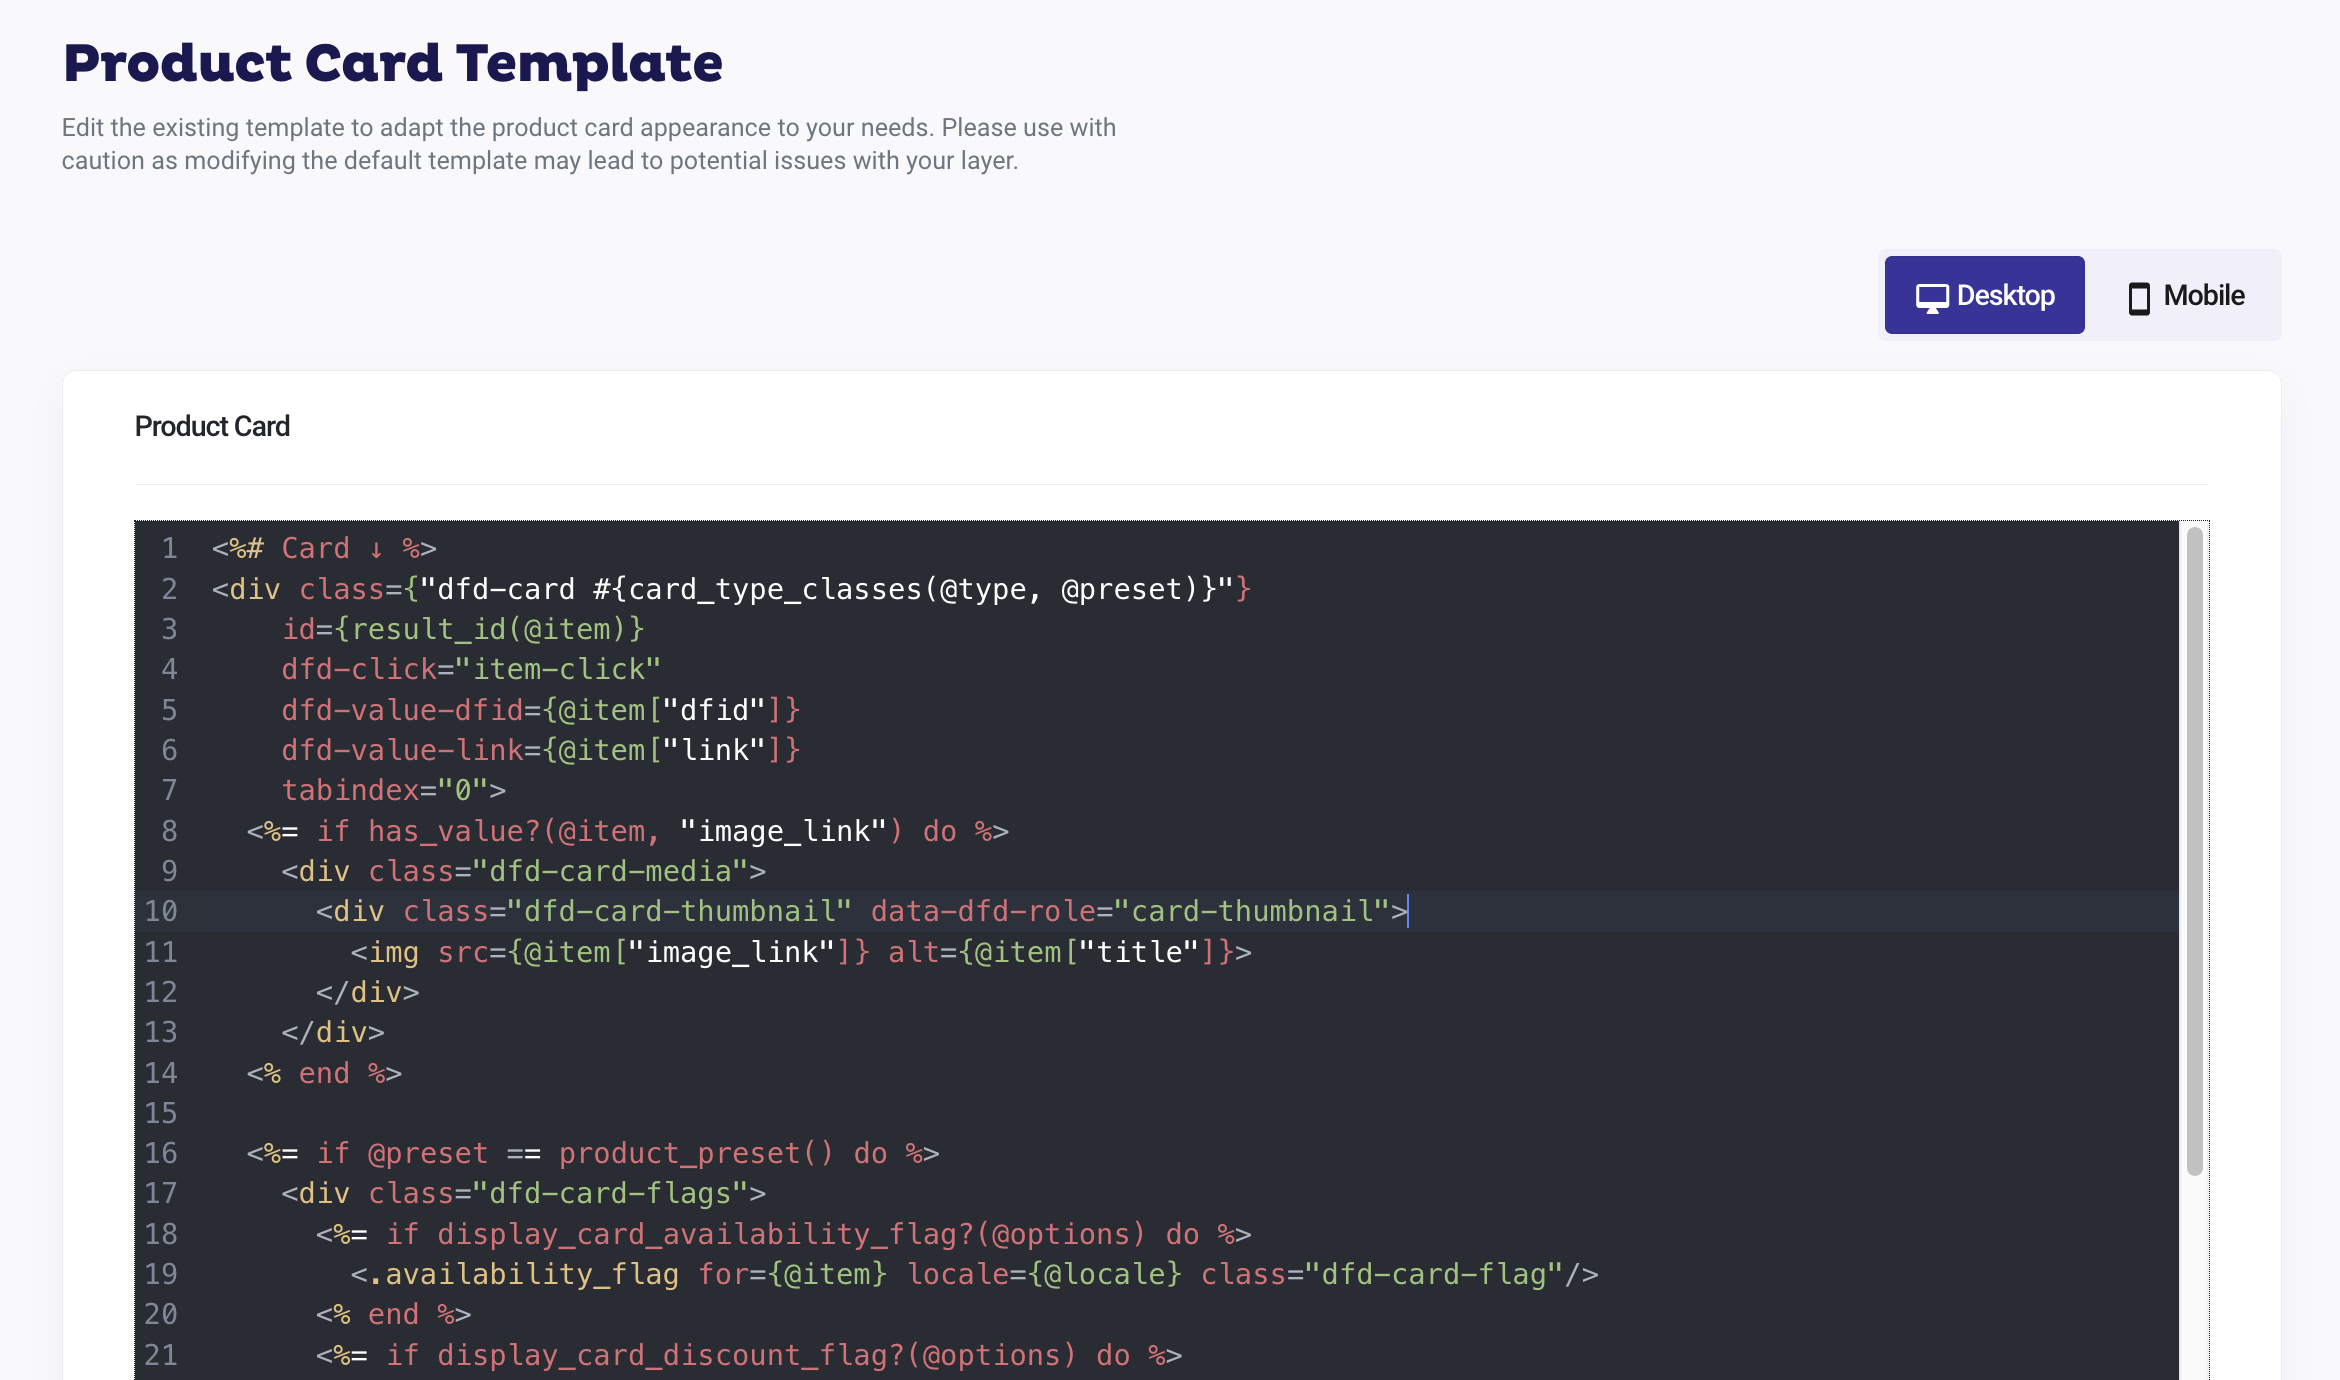
- Go to Doofinder Admin > Layers > Appearance > Advanced and click on customization under Product Card template. Within this section, you will find the HTML structure of your product card.
- Modify this HTML structure to your desired outcome. To do so, you'll need to paste a code snippet with your modifications.
You can:
-
Re-position elements: Change the positioning of the elements on the product cards by placing their code snippets in other parts of the template.
-
Introduce new data: Embed any new details you've started indexing for your products.
-
Resize or Reposition: Alter elements such as the product's image or title.
Every indexed data point is accessible in the HTML using the format @item["field"], where field stands for the specific indexed attribute's name.
    <div class="dfd-card-field" title={@item["field"]}>
      <%= @item["field"] %>
    </div>
You can copy the above snippet and paste it directly into the Product Card template, replacing the term field with the name of the attribute you want to display.
If you are not sure what the attribute name is, you can use the Playground section.
Example Use Case
Suppose you want to display the brand attribute in your product card. Here's how to do it:
- Copy the code snippet below:
- Paste the code snippet in the product card, for example, before the title information:
    <div class="dfd-card-brand" title={@item["brand"]}>
      <%= @item["brand"] %>
    </div>
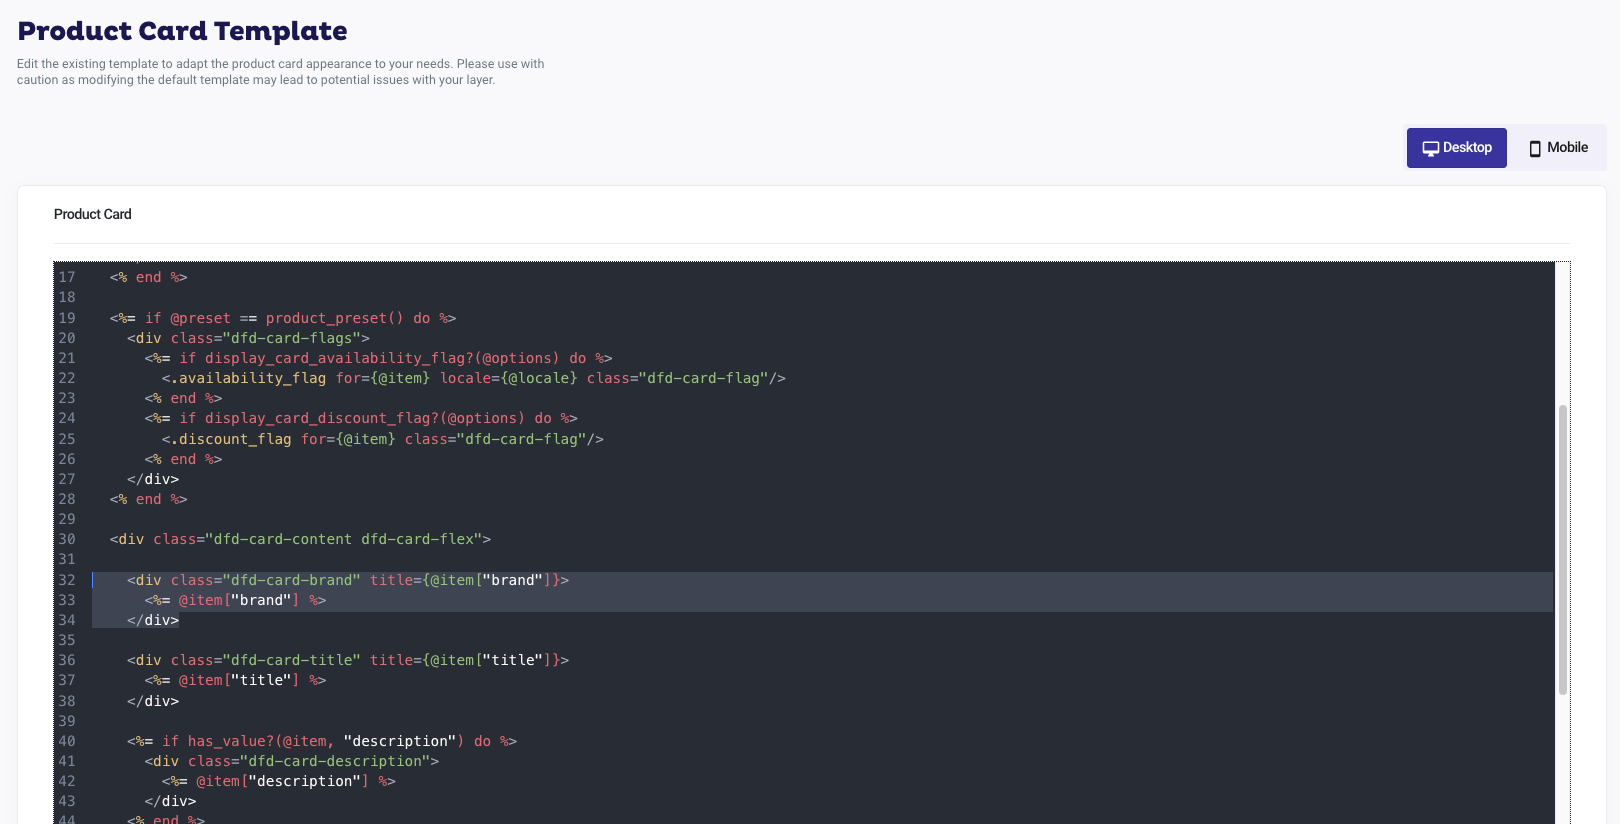
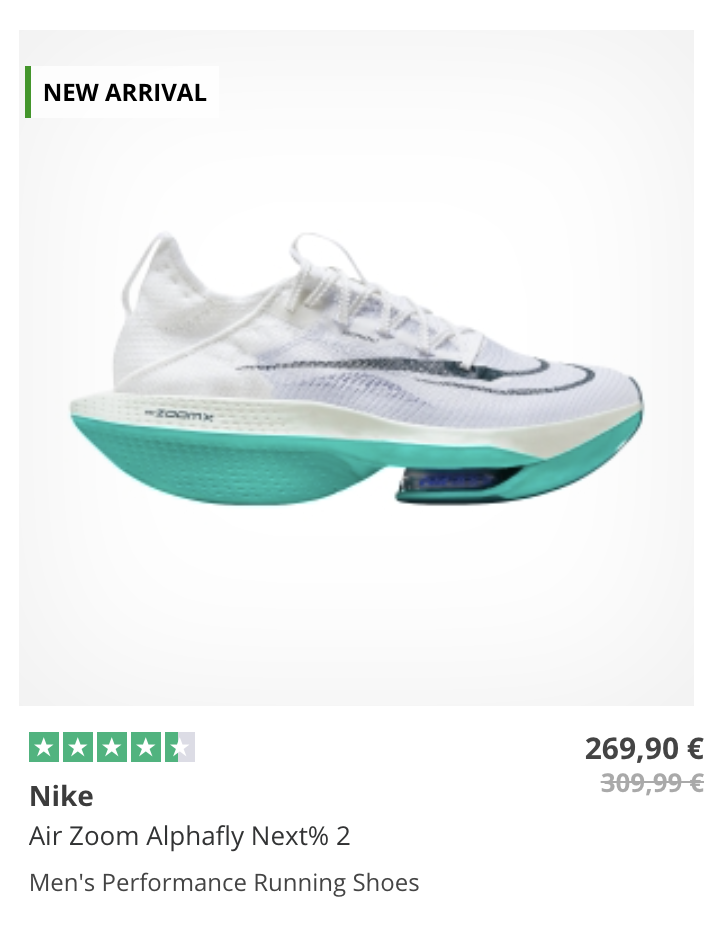
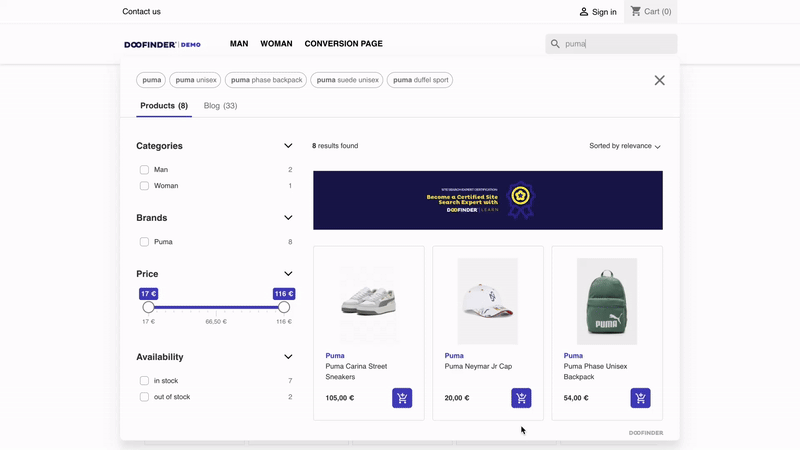
This is how your Layer will look like with the Brand field before the Title:
Apart from the content, the appearance can be further tuned by altering the CSS. To do this, you can navigate to the same Appearance section, but opt for the CSS customization area. This allows you to have granular control over the layout and visual aspects of the Product Card. To learn more, visit our Appearance documentation.
Remember to always align your Product Card customization with the preferences and expectations of your target audience.
Customization code examples
The most requested attributes to display within the Layer are:
- Brand
- SKU
- Labels or flags
- Other indexed attributes (e.g. "width" or "weight")
- Modifying the "Add to Cart" logo
- Adding quantity selector
Remember this information needs to be indexed in your data feed first.
Add Brand information
  <div class="dfd-card-brand" title={@item["brand"]}>
    <%= @item["brand"] %>
  </div>
Add SKU information
  <div class="dfd-card-sku" title={@item["gtin"]}>
    <%= @item["gtin"] %>
  </div>
Please note that in some cases the field may be indexed as "mpn" or "reference," not necessarily as "gtin." (Especially when indexing by plugin).
Add information when it exists
If you wish to display an attribute (e.g. "offer") that is indexed only for some items, you will need to use the following condition:
<%= if has_value?(@item, "offer") do %>
  <div class="dfd-card-offer" title={@item["offer"]}>
    <%= @item["offer"] %>
  </div>
<% end %>
Modify Add To Cart icon
Modify the <.icon> line to change the Cart icon. On the Product Card Template you'll find the following code:
<div class="dfd-cart-add-button">

            <%= for variant <- options.variants do %>

              <button data-role="open_selector" data-variant={variant}
              dfd-click={Phoenix.LiveView.JS.push("get-variants",
               value: %{item: @item, variant: variant})} type="button"
                class="dfd-cart-select-button">
                <input data-role="text_open_selector" type="text"
                value={variant} readonly/>
              </button>

              <input data-role="variant_selected" data-variant={variant}
               type="hidden" value=""/>

            <% end %>

            <button data-role="add_to_cart" data-item={item_encoded(@item)} type="button"
             title={text("add", @locale)}>
              <.icon shape="add_to_cart" size="32" />
            </button>

          </div>
To modify the Add To Card icon, replace html <.icon shape="add_to_cart" size="32" /> with the URL that contains the image you desire. For example:
<div class="dfd-cart-add-button">

            <%= for variant <- options.variants do %>

              <button data-role="open_selector" data-variant={variant}
              dfd-click={Phoenix.LiveView.JS.push("get-variants",
              value: %{item: @item, variant: variant})} type="button"
               class="dfd-cart-select-button">
                <input data-role="text_open_selector"
                type="text" value={variant} readonly/>
              </button>

              <input data-role="variant_selected" data-variant={variant}
              type="hidden" value=""/>

            <% end %>

            <button data-role="add_to_cart" data-item={item_encoded(@item)}
            type="button" title={text("add", @locale)}>
              <img src="https://cdn-icons-png.flaticon.com/512/4379/4379925.png">
            </button>

          </div>
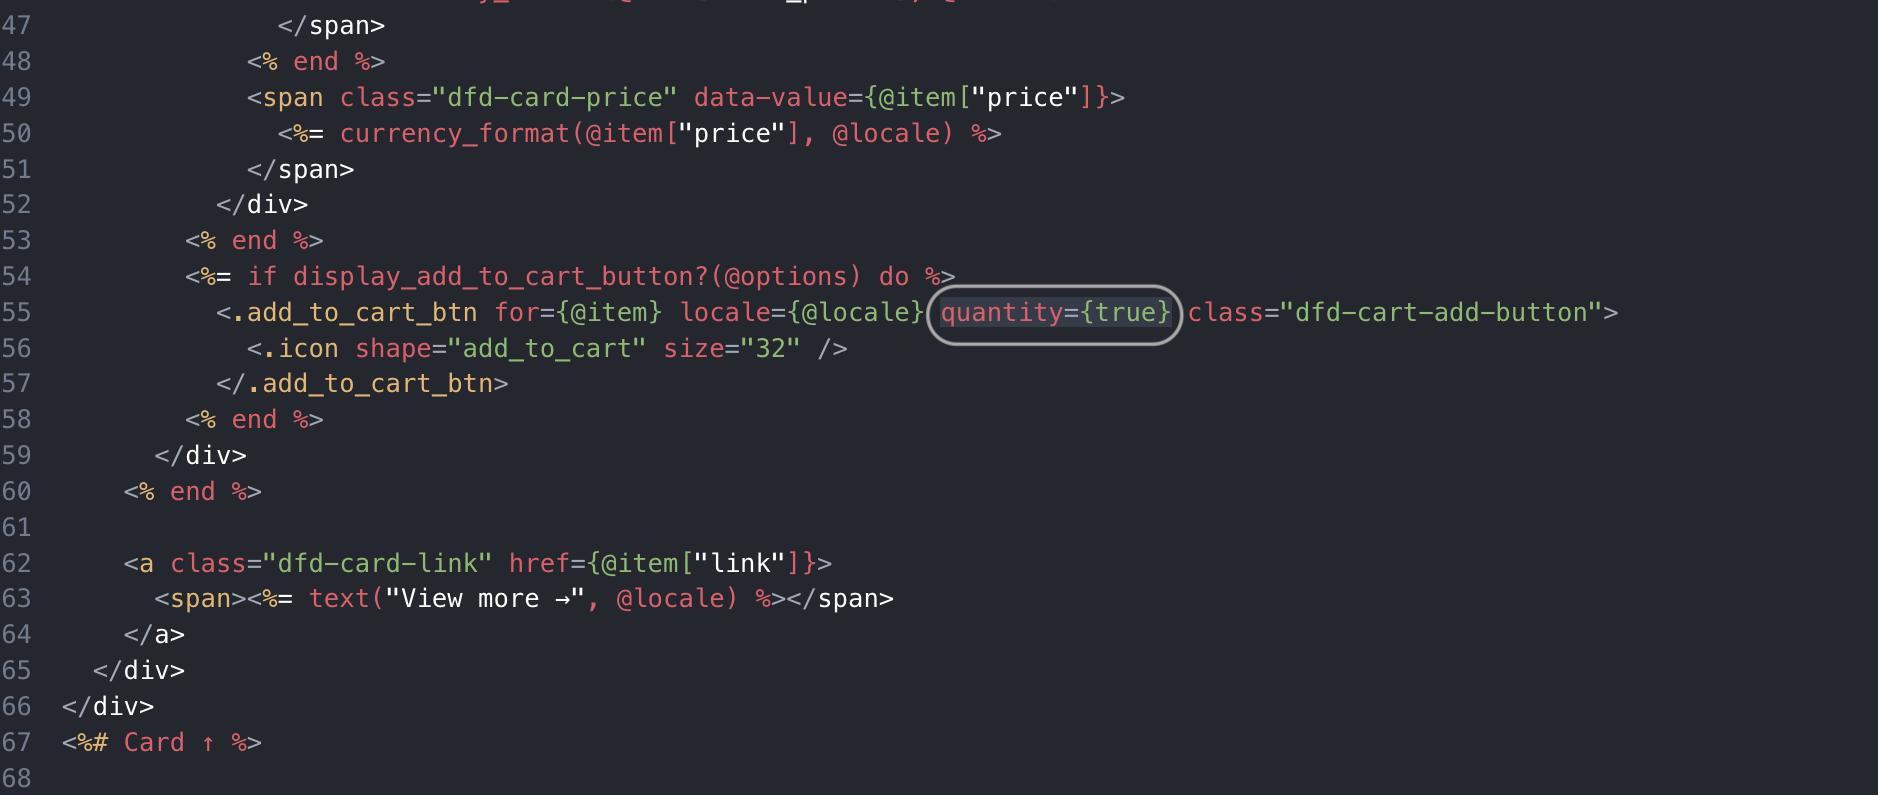
Add Quantity Selector to the Add To Cart
You can incorporate a quantity selector next to your Add to Cart button, as shown in this example:
To do so, it is necessary to include the attribute quantity={true} in the add-to-cart code line within the Product Card Template. Please note that the unit selector appears after clicking on the Add to Cart button.
To access the Product Card template, navigate to Layers > Appearance, scroll to the Advanced section, and click on Customize. For detailed guidance on managing the product card template, refer to this article.
Troubleshooting
Reset Template
If modifying the template results in it becoming blank or generating an error, causing the Layer not to display or function correctly, reset the template by clicking on Restore Default in the lower-left corner.
Syntax error
If you break the correct syntax of the HTML, a warning will appear when trying to save the configuration: "There was a problem saving your changes. Have a look at the error below."
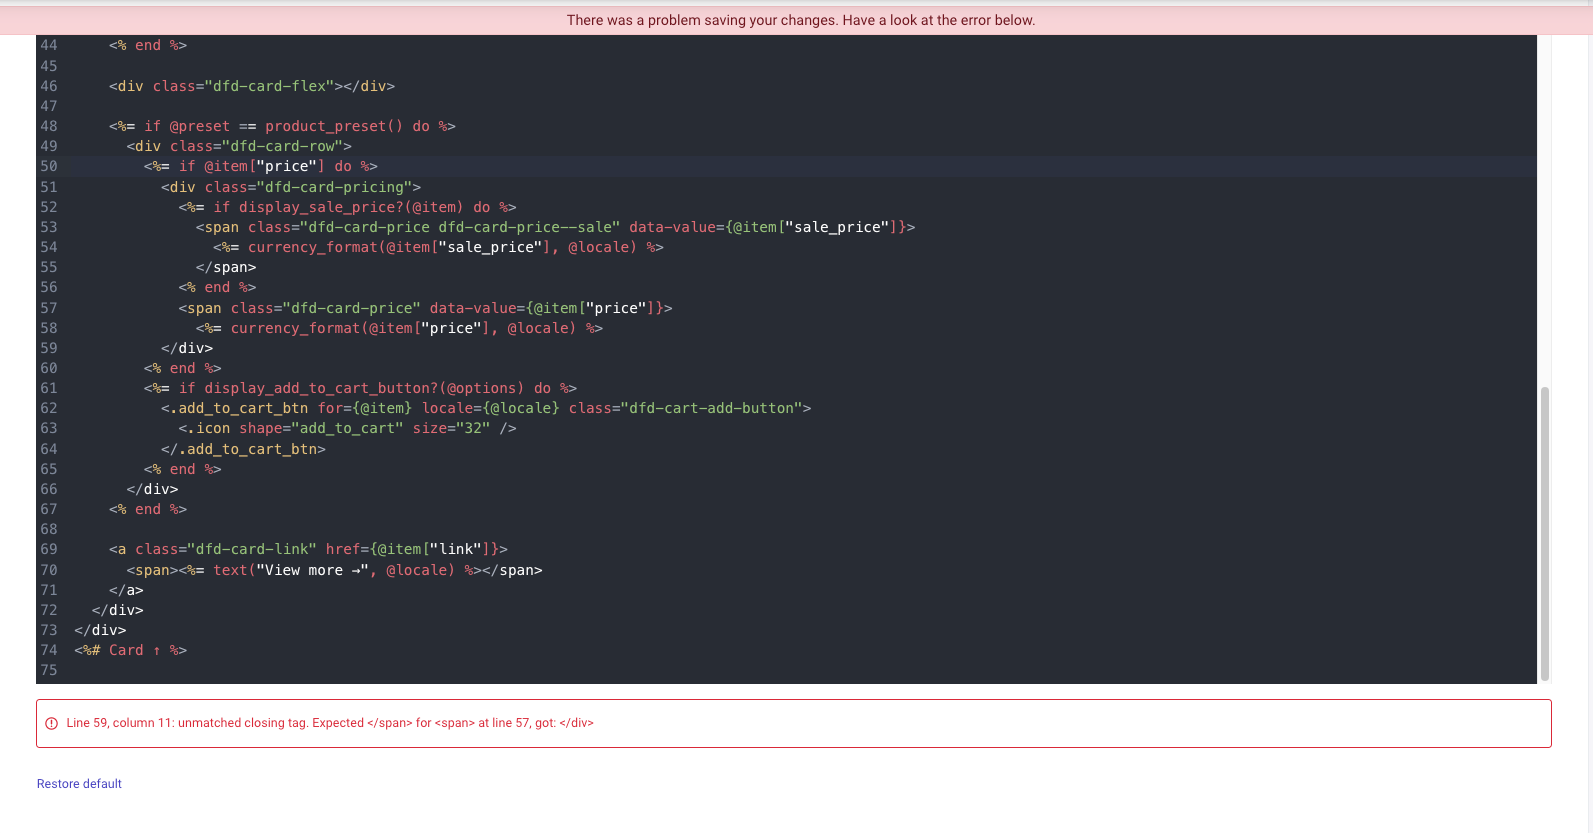
You need to correct the syntax in order to save the template modification.
If the logic of your modification is wrong, the Layer will display a blank screen on your site. The possible reasons are:
-
The attribute doesn't exist for at least one of the products.
-
The condition or function configured is returning an error.
If you are unable to fix the issue, you can reset the template to the default one, by pressing the Restore default button.